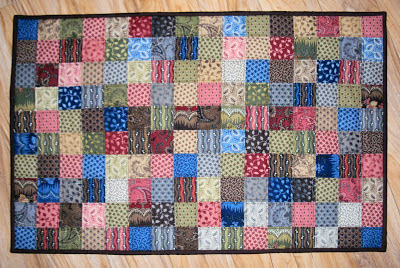
This is my bathmat:
Pretty imperfect - I didn't yet have a walking foot when I made it, and it shows, but cute anyway. My friend has been admiring this for a year and finally requested one of her own. She wanted dark fabric and lots of brown due to her 4 kids and blue color husband. I don't blame her. She chose Metropolitan Fair from Moda and I got to work.
The top uses a single charm pack, cut into 2 1/2" squares. I decided to try a method I had only read about - that of using an interfacing to iron the pieces onto and then folding & stitching. I took no pictures, but there are lots of good tutorials out there. Another benefit of this is that it allowed me to do a better job of being scrappy than I've ever accomplished before, since you're laying it all out at one time. Unfortunately, I must not have kept my seam allowances consistent, or else my interfacing stretched, because it had some severe waffling issues when I got the top completed. I had to redo a few seams and fuss with it a bit. I finally got it to lay flat, but it was a fussy fix.
The benefit to this method is undeniable though, as each seam meets more perfectly than seems humanly possible:
I could show you each seam in the entire thing & they would all be just that perfect. It adds some body, so I wouldn't do it for a quilt, but future bathmats & table toppers will probably get this treatment. I'll just have to perfect that seam allowance thing so that my seams don't shrink towards the middle.
The backing is the non-skid stuff you buy in rolls for shelf liner. It's nice & thin, so you can sew over it and is a fabulous idea for this project. I got it from a Moda Bakeshop recipe. Unfortunately, I thought I was being smart and added a layer of tissue paper underneath because the non-skid stuff wasn't wanting to glide thru my machine very well. So now I have the tedious task of picking out all that paper & it really doesn't let go that easily. If you make a rug, don't do that! No tissue underneath.
Like most projects I guess, a learning process and partial success. Perfection is forever that carrot dangling in front of me:)
Linking to Crazy Mom Quilts for her Finish it Friday.
Friday, October 12, 2012
Friday, October 5, 2012
That took longer than it should
The owl quilt is finally done:
I think the reason it took so long was the way I quilted each block in 2 concentric rectangles. Not fun. So even when I had some time to work on, I wouldn't always. And then I had 14,000 ends to darn. Not an exact count.
But it's done now and I think it makes a handsome quilt.
It's pretty large for a baby quilt - 44" x 57", so I'm calling it a youth quilt.
I'm also really tickled with how well the back coordinates:
Those dots were from a different store, and I knew they were older, but during quilting I noticed the date of 2009 on the selvedge, so 3 years older and just a perfect match. Crazy, huh?
Anyway, my shop has been updated, and I will be linking this to Crazy Mom Quilts for her Finish it up Friday series. So glad that's back! I love seeing what everyone else is doing.
Moving on, I've started a log cabin quilt with my Aster Manor leftover fat quarters:
Do you cut each piece to size, or just lay them out on strips like this?
Subscribe to:
Comments (Atom)


