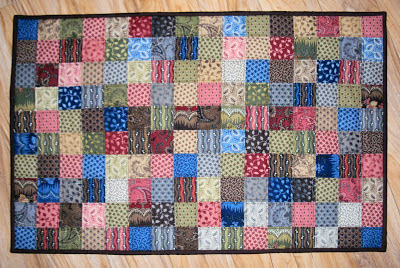
This is my bathmat:
Pretty imperfect - I didn't yet have a walking foot when I made it, and it shows, but cute anyway. My friend has been admiring this for a year and finally requested one of her own. She wanted dark fabric and lots of brown due to her 4 kids and blue color husband. I don't blame her. She chose Metropolitan Fair from Moda and I got to work.
The top uses a single charm pack, cut into 2 1/2" squares. I decided to try a method I had only read about - that of using an interfacing to iron the pieces onto and then folding & stitching. I took no pictures, but there are lots of good tutorials out there. Another benefit of this is that it allowed me to do a better job of being scrappy than I've ever accomplished before, since you're laying it all out at one time. Unfortunately, I must not have kept my seam allowances consistent, or else my interfacing stretched, because it had some severe waffling issues when I got the top completed. I had to redo a few seams and fuss with it a bit. I finally got it to lay flat, but it was a fussy fix.
The benefit to this method is undeniable though, as each seam meets more perfectly than seems humanly possible:
I could show you each seam in the entire thing & they would all be just that perfect. It adds some body, so I wouldn't do it for a quilt, but future bathmats & table toppers will probably get this treatment. I'll just have to perfect that seam allowance thing so that my seams don't shrink towards the middle.
The backing is the non-skid stuff you buy in rolls for shelf liner. It's nice & thin, so you can sew over it and is a fabulous idea for this project. I got it from a Moda Bakeshop recipe. Unfortunately, I thought I was being smart and added a layer of tissue paper underneath because the non-skid stuff wasn't wanting to glide thru my machine very well. So now I have the tedious task of picking out all that paper & it really doesn't let go that easily. If you make a rug, don't do that! No tissue underneath.
Like most projects I guess, a learning process and partial success. Perfection is forever that carrot dangling in front of me:)
Linking to Crazy Mom Quilts for her Finish it Friday.


This is something I've been wanting to do - make a scrappy bath mat. Yours look great (both of them!)
ReplyDeleteIf I had a bath mat that nice, I don't think I would let anyone walk on it!! I have been wanting to try the interfacing method, too - your seams are perfection! I think the tissue paper would work if you tore it off as you stitched each row. It tears easily when you can pull down and toward the stitches. Just a thought :)
ReplyDeleteI need to go find that interfacing method online now... your seams are perfect! I've had a kitchen floor mat on my wish list for a long time. I'll definitely be backing it with the non-skid (minus the tissue paper!).
ReplyDeleteNice work!!
ReplyDeletethat seam alignment is impressive! I haven't tried this method, but I have heard good things about it. nice bathmat :)
ReplyDeleteNow I need a quilted bathmat - what a great idea! Where do you get the backing stuff? Could I find it at Walmart or is it a fabric store thing?
ReplyDeleteGreat job - your seams are super impressive. I wish you patience on picking out the tissue paper!
I agree with Jennie...I need one too, only I do not have the patience to stitch with the non skid backing. Wow, you are brave. Bad words would probably come out of my mouth while stitching;-)
ReplyDeleteBoth rugs look wonderful.
blessings, jill
Amazing craftsmanship! With just a little effort, you can make something like this. I doubt your friend would ever let it get ruined! I think patience is not my virtue so I will just admire it for now.
ReplyDeleteYon Vann
May I ask where to find a tutorial for the interfacing method? I like the idea very much, but can't find anything that looks right at the moment. I'm probably not using the right terms while searching! Your bath mats are darling!! I've added this to my ever-growing project list, since my mats are really sad looking at the moment! I'm thinking these would be great in my kitchen by the sink, too. That mat has rubber backing and is disgusting in nature, LOL!
ReplyDelete